Posts

Building an AWS Lambda through AWS Console and Visual Studio

Image
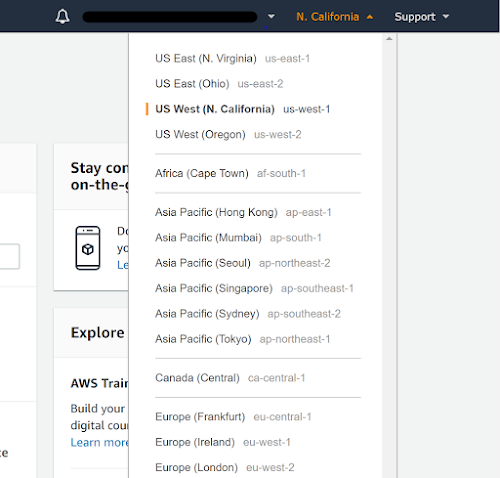
One of the most useful services available in AWS is Lambdas. A Lambda is a serverless app that can be used to run custom code manually, on a set schedule, or when a separate AWS service triggers it. Lambdas are especially useful when you need to schedule actions to run on one of your apps. I will show you how to create the Lambda through the AWS Console and how to build and push the code using Visual Studio. Create an AWS Lambda through AWS Console Creating a Lambda through the AWS Console is very simple. To do this, you first need to login through the AWS website (you can create a free account for development purposes). Once you have logged in, make sure you are in the region that you want the Lambda to run in (it is possible to have a Lambda access services in a different region, but that is beyond the scope of this tutorial). Once you are in the desired region, select Lambda in the list of services. Here is where your Lambdas in the selected region will appear. Click Create functi

A Basic Intro Into Making React Components

Image
We have all been there; we are developing a page that is like another, so we copy an entire section of code from another page to add to our new page. This works, but now we just added another 500 lines of html to our already 1500-line page. Since we are the ones who wrote the page it makes sense to us, but to others it is impossible to find what sections need to be changed when a bug is found. Even worse, if the bug exists in the copied code it needs to be fixed in the source and all copied locations. This is a nightmare when it comes to long term maintenance of a site. A component reduces redundant code and simplifies pages into small, easy to understand chunks that can be modified easily. Transitioning to components is somewhat easy but takes some practice to see when something should be broken into a new component. Generally, components should be dumb and not contain too much data interaction. They should take in data to display and execute functions on the parent to mutate data.

Setting Up IntelliJ Run/Debug Configurations

Image
  IntelliJ is a powerful integrated development environment that supports many languages and supports multiple module applications. When starting out, the configuration page may seem daunting because configurations may not auto populate. In this example we will be setting up the build for a Vue application; but the process is the same for any JavaScript framework using a node express server. To get it started, click the + button to add a new configuration. From the list select the framework you are using for your application. Depending on your selection, some defaults will be provided. For example, when npm is selected it will search for a package.json in your directory and set the command. This is the basics to get your applications started, but we can take this a little bit further. In a typical team environment, the package.json is getting updated as team members are adding dependencies for the code. We can use the Before launch section to make sure everything is updated before

Demystifying User Secrets in .Net Core

Image
User Secrets are a convenient way to store local configuration values in your .Net Core applications. When you create a new .Net Core application, a usersecrets.json file will be automatically created for you to store your local config values. You can manage the values inside your solution by opening up the json file through the web project context menu. Inside this file, you will see an empty object by default. You can copy over your entire appsettings.json or specific sections and modify them as you see fit for local use. When you run the solution, the config values in usersecrets.json will merge with appsettings.json and overwrite any values that match. If you want to see where the file is located, right-click the open tab in VS and click "Open Containing Folder". This will take you to your local AppData > Roaming directory. If you back out of this directory, you will see folders for all of your apps and you will notice that MS uses g

CQRS db Contexts with .NET Core

We're developing a new app using .NET Core 2.2 and it's time for some redesign. When it came to EF db Contexts we wanted to separate our Reads from our Writes (a la CQRS) more explicitly. We needed to work with the same entities in both BUT we still wanted to optimize performance with Reads and customize Writes separately so below is a quick and easy implementation. Base Context Setup a Base Context class that you will inherit from; you can either inherit from DbContext or in this case IdentityDbContext since we're also leveraging Identity Core. public abstract class BaseContext <TContext> : IdentityDbContext<User> where TContext : DbContext { protected BaseContext (DbContextOptions<TContext> options) : base (options) { } protected override void OnModelCreating (ModelBuilder modelBuilder) { base .OnModelCreating(modelBuilder); } // TODO add DbSet<> for each entity/table (as needed) public DbSet<Audit> Audit { get ; s

Update: Single connection string for Multiple Developers

Image
https://dcdevs.blogspot.com/2017/06/single-connection-string-for-multiple.html If you have implemented the trick above, you may have noticed it has stopped working when you moved to a .NET Core project. This is because the DB connection alias is achieved via registry keys which is a Windows-specific behavior. .NET Core supports cross platform development, so Microsoft elected not to implement this Windows-only feature. However, .NET Core provides a new way to manage such configurations across developers - user secrets. In Visual Studio, right click on the project that contains your appsettings.json file and navigate to manage user secrets. User secrets are machine only - Visual Studio will not try to check them in to source control. Here, you can mimic the structure of your appsettings.json to overwrite any configuration setting - not just the connection string! Any values you define here will overwrite the corresponding appsettings.json value (hierarchy must match).

User Registration with CAC/Client Certificates in Asp.Net made easy - PART I

Implementing CAC registration in Asp.Net web applications is fairly vague and mystified. Quite frankly, there just isn't a lot of literature on this topic, and what is out there tends to be rather old and not very comprehensive. That said, I'd like to share a way to implement a CAC registration in your Asp.Net web applications. Note, this article is only going to cover things from the .Net Application perspective. For more info on setting up CAC/Client Certs in general, view our other articles. https://dcdevs.blogspot.com/2017/06/iis-express-client-certificates.html https://dcdevs.blogspot.com/2017/06/aspnet-mvc-how-to-enabledisable_19.html The first thing to do is to create a class that can take in a ClientCertificate, validate it, and parse out the information needed to create an account. Here is an example of a CertificateManager class that can be used in your app. public class CertificateManager { public Boolean HasCertificate { get; } pub